Friday, April 30, 2010

Ferns

One of my favorite things has become ferns.  They weren't always my favorite plant but, they have grown on me like a steadfast friend.
The Victorians became in love with ferns and with their penchant for collecting they dried them and pressed them in frames.
 Image from burrenperfumery.com
They are nature's lace.  That explains why I like them.
I love lace.
Image from gettingmarried.com

They look incredibly delicate...

 Image from wikiwak.com
even though they have been here millions of years.
 Images from enchantedbeachweddings.com
They are a favorite for weddings.
Image from barharborinn.com
Who would have thought you could put them on the cake?
Image from enchantedwedding.com

But they do put them on the cake literally.
Image from travel.webshots.com

On of the most popular places to have a wedding is The Fern Grotto in Kaui, Hawaii.  It is beautiful.  I can't top that so I will have to stop.
I am linking up with Laurie at her site Bargain Hunting and Chatting with Laurie  for My Favorite Things.  Please go to her site and view all the wonderful favorite things.

Thursday, April 29, 2010

Colour ME Happy!!!

{me & maria}

We got a visit from Maria Killam of Colour Me Happy this week!!!  Maria flew down to DC (really Virginia) from NYC this week and we had such a great time!  Maria is everything she seems on her blog and more: super-stylish, quick-witted, thoughtful, frank and so much fun.   She's continually looking to grow & learn and is a natural teacher.  This may sound cheesy, but she's a very wise, self-aware person.  . 


 I got to go on a Colour Me Happy color consultation to see her in action and (of couse!) she's so good.  I have no doubt her client will be thrilled with the results.  She also picked out some colors for me at our house for when we get to those rooms!!  yayyyy

{the perfect little turquoise vase she brought me}

Maria also filled me in on the latest color trends and one of my favorite descriptions was "Pretty Ugly."  Click here to read more about it.   I also learned that I'm totally in the stoneage as far as technology goes and have a lot of things to learn like twitter, snaggit and windows live writer.  Maria is so generous with info and I have a mental checklist of all the things I need to get on like a Pure Style Home facebook page, etc.  Anyway, it was awesome to meet another amazing blogfriend and we can't wait to see her again!!  She's amazing!!

xoxo,
lauren

Grillin'

This is how happy I am when I get my grill out!!!
Love this commercial. (This is a re-post from 2010.)
Weber Grills gives me no compensation or products for this video.
Weber Grills owns this video and allows this video for upload to Blogger.
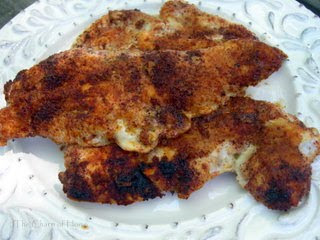
Southwest Chicken

This is super easy!
You thaw out desired number of chicken breast.
Rub with olive oil when thawed.
Sprinkle generously with equal parts garlic powder, chili powder, and paprika.
Cook on grill until juices run clear and not pink in the middle.
Recipe Source: Southern Living
Potatoes & Onions Side

Here is my old standby side I put on the grill with the chicken.
Wash and cut into cubes desired number of potatoes, skin on.
Cut up and quarter 1-2 large onions.
Place all potatoes and onion in a large bowl.
Drizzle with olive oil.
Put in desired spices. I use salt, pepper, and garlic powder.
I have also put a little rosemary in this dish. Fresh herbs add great flavor with this.
Toss all to coat evenly with spices.
I usually make two foil packets with this recipe. But, depending on serving size place your veggies on aluminum foil and seal (this is important) the edges by folding down and crimping. When you leave a gap in the foil it will take forever for these to cook, and your hungry! So seal those edges. This takes about 30 minutes to cook. If raining it will work in oven about 400 degrees for 30-40 minutes. Do the fork test to see if potatoes are done. Serve right out of the foil packets and NO DISHES!
I love grillin' season. The livin' is easy. Now I am going to make some of this chicken and dance!
I will link this to the Summer Blog Party.  This entry goes to:
Outdoor Cooking and Dining at DIY by Design.

Wednesday, April 28, 2010

Fern Tablescape

When we moved to this house the property had some plantings on it from the previous owners.  One of the things we inherited were these ferns.  For years I have moved them back and forth from back yard to front yard.  They have taken root in my front flower bed and they love it there.  I have tried to thin them out but, they come back every year and take over the bed.   They are growing on me more each year.  They are lush and a wonderful shade of green in the spring. 

I have showed you this pressed fern before.  It is super easy to press a fern and frame it.  All you need to do is place two pieces of paper in a large book and slip the fern nice and flat between the paper.  Place many heavy books on top and in a few weeks it will be dry and ready to frame.  I have this one on a piece of calligraphy paper.  Cost $0: Frame was given to me, fern was free, calligraphy printed from the internet.
This table has a lot of texture and pattern.
  Napkins were from TJMaxx on clearance 4 for $2.00.
Pewter napkin rings were gifts.
  The place mats were from Pier 1.  They were $ 4.95 a piece.
 For the centerpiece I have the vase of ferns, the fern print, and the hurricane filled with key limes and a few lemons. When your done with them on the table cook, with them.   My children wanted to know what the key limes were.  So, I squeezed a few and put them in a pitcher of lemonade.  They were a hit.  I will make a key lime pie with them so they can try them out.  

 The place setting:
Dinner plate/used as a charger: Domestications (Mom's)
Dinner  plate: Thrift store
Salad plate: Domestications pattern is Athena (Mom's)
Sherbet: Thrift store $.75 a piece.

 This dinner plate was on clearance at the thrift store.   One of them had a hanger on it.  I guess someone had them on the wall.  I love ferns on linens or dishes so I looked at them and saw potential for a very pretty table.  I think they were a $1 or 2 a piece.
Ice Tea Goblets: The Cellar by Macy's four were $11.99
I am joining Susan at her site Between Naps on the Porch
for Tablescape Thursday.  I will also join Tales from Bloggeritaville
for Thrifty Thursday.   Please go over to their sites and view 
all the wonderful ideas from talented bloggers.

Tuesday, April 27, 2010

Outdoor Wednesday

I am joining Susan at A Southern Daydreamer for Outdoor Wednesday. I am so excited to finally have something to show you.   Two years ago my yard had a track hoe sitting in it and a very large hole from a large addition we built.  We have just had a spring shower and I couldn't resist the look of the flowers with all the rain dripping off of them.
Love the pop of color from the simplest flowers.
My 5 yr. old picked out a hosta for me with the biggest leaves
we could find.  I have always wanted one of those.
We are still working on the yard.  It has a lot of problem areas.
The one thing I missed the most these last two years was my 
kitchen herb garden.  It was right out my back door and I would
cut herbs for cooking.  But, with a trip or two to the nursery we have 
a few herbs to get me back in business this year.
 Isn't rain so pretty dripping off of flowers.
Every year I put pansies on my front porch.
Thanks for joining me in a stroll around my house.
I hope to have lots to share with Susan this summer for Outdoor Wednesday.
Please go over to her site on the link above and view all the great outdoors.

Monday, April 26, 2010

Just a Year Ago...

**update**  We moved from this house to a new one (another fixer upper in September of 2012) so here's the story of our last home...  (No after pics of the new house yet ;) ;)


Today I'm joining the Poppies at Play Parade of Homes Tour!  So if this is your first time stopping by- welcome & thanks so much for coming!! 


...  Just a year ago we moved into our new {70s} home.  We've made so many changes to it that I thought a before& after post of the whole house would be fun.  I'll put links throughout the post to the specific rooms in the house so if you've got any questions, check those post for answers, sources, how to's, etc.  Also, the pics have been taken throughout the past year as we completed the projects which is why you'll see so many seasons in the different pics.


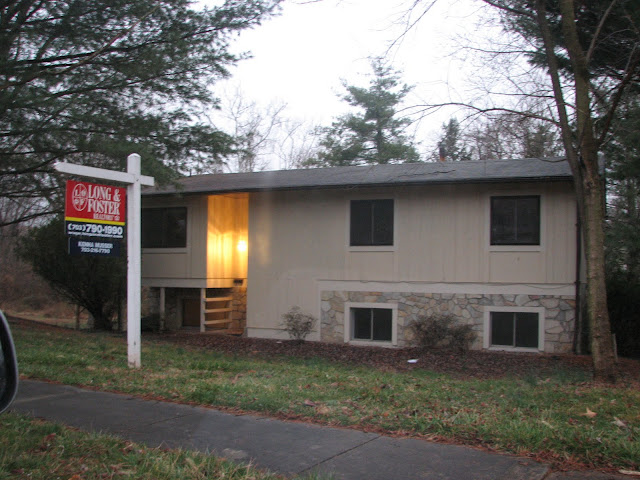
Our house had been vacant and on the market for about 4 years before we came along & bought it. (above) You can read the original post I did about it here.  I was totally IN LOVE even though it was a bit sad-looking.  We were told by numerous family members (and even one of our realtors!) what a mistake it would be to buy this house.  Well, my husband & I aren't known for listening to others (Sometimes to our detriment & sometimes to our benefit!)...  so we took the plunge anyway. 

We painted the cedar a dark gray and added a trellis with climbing jasmine and as many shrubs as we could afford.  (Still planning on adding more :)  Here's a photo I took "after" during one of the blizzards we had this year: 

The entrance (below) was in need of some loving:


...And here's what it looks like now (errr on Halloween ;):

{Bright orange front door, new lantern, rug, paint, etc.}

Our foyer was really bad.  I'm not even sure the photo below does it justice.  The linoleum floor was beaten up & grimy and the pendant cast a sickly yellow light in the space:
{Before}

I wanted something interesting and a little "off"...  and something that would have a big impact when you first walked in... so we hung a bunch of DaVinci sketches randomly along the walls:
{After: fresh paint, custom frames, new caged lantern, orange door & seagrass carpet}

The living room is one of my favorite parts of our house.  We're up in the trees and it feels like a treehouse, especially with all of the windows open and a breeze blowing through.  Here's a photo of it before with wall-to-wall carpet:


And here it is now (or last week; I've already rearranged since this pic, something I do all the time)..

{My husband, Dave, installed hardwood floors and we had a custom wool rug cut for a soft spot to play for our kids}

And here it is this week:  (I promise I don't have too much time on my hands!! ;) ;)


Here's a view of the side wall before:


And here it is now:


{photo by Helen Norman}

{We added an a mantle with a mirror for a focal point on the once bland wall.  Dave also did an awesome job stencilling the wall with an allover pattern... )
Here's the bookshelf we jam-packed with books & things we've collected over the years.  The 2 lower shelves house toy boxes:


The dining room is smaller than it looks and is open to the living room.  Here it is "before:"

And here is is now:

{After:  New chandelier, furniture, blown-up 15th Century Drawing  on wall...  For details on the dining room click here}

Our kitchen met with its end the second day after closing on the house...  Here it was before:


And here it is now:


{We removed the upper cabinets, added beadboard & shelving, painted the lowers, did hardwoods and painted out old fridge with chalkboard paint for fun}

Here's our little breakfast nook now:


{It's a great place to hang and I love our old-fashioned wallpaper...  For details on our kitchen redo, click here}

Ok, now onto the bedroom!  Here's our bedroom 'before' in all its glory:

{yum! yum!}

And here it is now:

{That's Ashby on the bed.  We found the brass headboard on the side of the road and it sort of guided the design of the room which is a mix of old & new, white and metallic.. for more details, go here  ...photo by Helen Norman.}

I hung up some of my jewelry on the wall & I wear it so much more than I used to:


...Like I said, things move around a lot...  Here's a view of my nightstand with the chair over there:

{photo by Helen Norman}

Our preschooler's (Christian's) bedroom is a tiny fun spot in the house:


We hung up pages of the Saggy Baggy Elephant on the walls (above) and turned his closet into a little play area with a chalkboard paint hill and a green vintage wallpaper lion:


We just finished decorating our new baby's (4 month old Justin) nursery.  We went dark & a little nutty in here:


The walls are a dark navy and we made the canopy out of a stencilled dropcloth.  we made sure to include a place for Christian to hang out in Justin's room so he feels included:

{Christian chillin in his reading nook}

Now onto the lower level.  (And I'm only showing you one room down here because the rest are still in progress and are NOT pretty) Here's the space before, planned to be a combination family room and office:

{lovely linoleum}

And here it is now:


I love having this huge table to spread projects out on.  We had wall-to-wall seagrass carpet installed and we love it.  (It can't be hurt!!) I wanted it to feel happy & airy down here so the panelling got a fresh coat of aqua paint. 

Before we moved in, there was a weird  fenced in elevated area with a drop ceiling.  Don't ask because I don't know why:


...So we knocked it all down & leveled it and it's now the TV/ seating/ play area:


Having a ton of hidden toy storage is key to keeping me feeling sane:


We've got an ever-growing collection of flea market paintings so up they go above the sofa:


And finally, here's another veiw of the family room before:

{Gotta love that 70s stone}

We debated & debated about what to do with the stone and the wood-burning stove but in the strangest way the stone started to grow on me and now I love it.  The wood-burning stove was awesome & so cozy in the snow storms, so it's definitely staying for now:


{Lanterm, Ikea  Chairs & Ikea ottoman with custom washable slipcover...  For details on the lowerl level redo, click here}

...And that's about it for now!!  We always have something going on over here so I hope you'll come back.  (And everyone who is always here, thanks for bearing with me for all the repeats!)

Anyway, thanks so much to Andy for inviting me to be a part of the blogger home tour!! I'm honored to be included!!  :)  I hope everyone  enjoyed it and now it's time to head on over to House 


xoxo,
lauren