Showing posts with label Show and Tell Wednesday. Show all posts

Monday, January 10, 2011

Altered Couture for Home Decor

Have you ever heard of Altered Couture?  It isn't just a magazine (pictured above) made by the Stampington Company.  It is a movement in fashion that has taken hold (revived) in the last several years.  By this, hobbyist and artist create one-of-a-kind individual pieces with the recycling of past fashion materials.  A few examples that are a treat to look at are Armour Sans Anguish and  Supayana.

Image: Supayana

 Image: Armour Sans Anguish

Neat huh.  Imagine recycling clothes to look this good.  What if it was done for home decor?  I have seen a lot of things repurposed, upcycled, or altered, whatever you want to call it.  In home decor you really need a lot of yardage.  It isn't as easy to take clothes and recycle for the home.
You know my tea cozy.  It was altered from a Woolrich wool vest.

One commenter said it looked like a sweater for my teapot.  She was really close.  Here is the original vest.   

What do you think about upcycling?  


Do teapots look good in sweaters?

How about this table runner?

The shabby chic fabric for this table runner came from a Liz Claiborne dress.

Here it is after I used the bottom for the table runner.  These are the only two pieces I have ever upcycled.  I really found it fun to do.  I liked challenging myself to look at something and find another use for it.  Have you ever altered any clothes? 
The tea cozy in for sale in my Etsy Shop.
I will link to these ladies go and visit them.
Get Your Craft On at Today's Creative Blog
Toot Your Horn Tuesday at A Silly Little Sparrow
Second Chance Tuesday at Bella Rosa Antiques
Boring to Better Party at Savvy Southern Style
Whatever Goes Wednesday  at Someday Crafts
Show and Tell Wednesday at Blue Cricket Design 
Whassup Wednesday at Elements Interiors

Tuesday, November 23, 2010

Glittered Pears

I saw these glittered pears in a magazine and I thought they would be really pretty on a table.  You will need an inexpensive faux pear.

Then cover your pear with Mod Podge.  I applied mine with a sponge brush.
Then all you need to do is cover it completely with glitter.

The glitter I used was called Glamor Dust, it was very fine. (Hobby Lobby carries it.)

Last, I trimmed a silk leaf and hot glued it to the base of the stem of the pear.  I found the leaves in the bridal department at Hobby Lobby too. 

Now all you need to do is decorate your holiday table.  
I will join these web sites, go and visit them.

Whatever Goes Wednesday at Someday Crafts
Show and Tell Wednesday at Blue Cricket Design
Get Your Craft On  at Today's Creative Blog

I will join Joni at Red Couch Recipes for the Thanksgiving Challenge.  I am thankful for coffee.

Tuesday, April 13, 2010

Spring Decor for Your Door

I found this great nest at a local discount store this weekend and I knew I had a thrift store basket that would work well for this project.
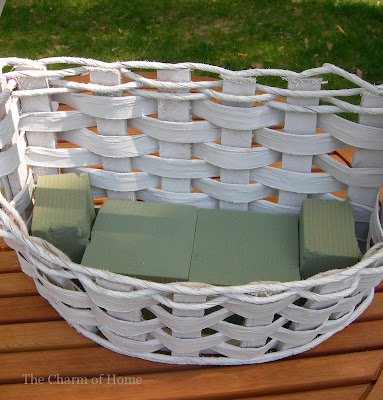
The basket started out natural and I spray painted it white.
I placed  floral foam blocks down in my basket.
I placed a large piece of sheet moss over the blocks.  
 I placed my new little nest in the center of the sheet moss.
Then I placed some ferns in the sheet moss and stuck them down into the foam blocks.  You could pin any of this down with floral picks or pins too.

 I then added some baby's breath for a filler. 
 I took 3 yards of a white wired ribbon I had left over from another project and fan folded it to the size bow I wanted.
 I then fold that in half.
 Then I cut each corner off.  This is just how I make a bow.
I am sure there are other ways to do it.
I stick a floral pipe cleaner through the fold.
And then I twist it real tight.
Then I fluff my bow.

This is the finished product.  The plus to this basket is it had a flat back that hung on the door and it had a flat bottom which could sit on a table so you could get multiple uses out of it.
Just one more close up of that little nest.
I will be linking this up to Fun to Craft's Look At Me I Am so Crafty party.
Blue Cricket Design's Show and Tell Wednesday.
And Faded Charm's White Wednesday.


Tuesday, April 6, 2010

Butterfly Picture Makeover


I promised you yesterday I would show you how I made the butterfly frame in my spring tablescape.  This is the butterfly frame when I started.  I picked it up at the thrift store for $2.  It was this wonderful shade of apple green.  Not a bad color at all but I just didn't like it for highlighting this butterfly.  So I brought it home with the intent to remake it.
The backing looked just like a brown paper bag.  I peeled that off and this was what was left.  It has this velvet hanger with a brass ring too, which is really nice.

After I dismantled the picture and frame.  I covered the velvet hanger with tape and I spray painted the frame several times.

While the frame was drying, I took the cardboard insert out of the frame and used it as a template to cut a new backing for the butterfly out of this calligraphy print.  Now, I am going to tell you all about this calligraphy print and where I got it on Friday.  I have another big remake on Friday and I am so excited I can't wait to show it to you!  Okay, back to this redo.  I Mod Podged the calligraphy with just one coat of Mod Podge and I didn't cover the top of the calligraphy with it at all.


I had to put a new butterfly in the frame because the other butterfly fell apart when I removed it.  Now your asking yourself right now where did she get that butterfly?


The kids and I have had this entomology  project going on for the last two summers.  This is my father's 4H entomology project that he had from the 1960's.  The kids and I have found a few butterflies and moths and replaced the old faded ones in the case.  So, I had a duplicate and that is the one I used in the frame makeover.  You can find butterflies farmed and sold for mounting on the internet.  I don't make a practice of catching any butterflies that are now dwindling in number such as the Monarch.  The one in this case is from the 1960's.

I also roughed up the frame with sanding sponge a little so it looked chippy and old.  

Here is another frame where I used the calligraphy as a background mat.  This is with a pressed fern out of my garden.  When the ferns come up I will be showing you how I did this  and possibly some other projects with the ferns .   I will be linking up to Faded Charm's White Wednesday, and Blue Cricket Design's Show and Tell Wednesday.  Take a look at these parties and see what projects bloggers are coming up with for spring.

Tuesday, March 16, 2010

White Wednesday: Irish Lace


 The story of an original cottage industry.  The story of Irish lace.

Irish lace is world famous for the intricate designs that develop from very simple patterns. While lace making today is a big business, with large factories rolling off yards of fabric in minutes, the earliest Irish lace was a basic cottage industry.
In the 1800s Ireland was a divided land. The wealthy lords owned the land and tenant farmers produced crops for the owners. Many families in Ireland lived in small cottages on land called crofts. The family usually grew their own food on land not used for producing crops for the Lord of the Manor. Most of the crofters were "dirt poor" with little money for necessities.
With the lack of land and the rocky soil the most productive crop to grow was potatoes. Some of the cottage farmers did grow grains or vegetables, but even the seeds to produce these crops were too expensive for most of the tenant farmers. When the potato blight swept across the country between 1845 and 1851 and destroyed the crop it meant starvation for thousands of households.
Many of the Ursuline nuns were familiar with Venetian lace, brought over from France. Women had been producing rough cloth for their families for generations. The nuns realized the opportunity that these skills presented to help save the people from the famine and began teaching many girls and women to produce the fine crochet that has come to be known as "Irish lace." The wealthier Irish families that could afford to buy the lace earned the name of "lace curtain Irish."

Designs and motifs were developed by families. The patterns were closely guarded secrets passed from mother to daughter. The details were kept so secret that many of them were lost as the families either died or fled the poverty for other lands.
The crochet schools established by the nuns in the 1850s and 1860s disappeared as fashions changed and the demand for the cottage lace declined. The introduction of factory production changed the industry and mass production of lace is now the rule.
The 1880s saw a brief revival of the cottage lace industry and produced most of the samples that are now family heirlooms or museum pieces.
Information obtained from this website:
http://www.chiff.com/home_life/holiday/st-patricks-day/irish-lace.htm


 Another great place to visit is The Sheelin Antique Irish Lace Museum & Shop.
 An added bonus is if you go to the Museum tab and scroll down to the bottom of the page till you see this symbol  and click on it you can take virtual tours of some areas of Ireland.


With the wonderful history of Irish lace it seemed fun to recreate a handkerchief in the style of Irish lace with a crocheted trim.
 I have laid out a 13 inch square of the finest cotton I could find.   A batiste would be perfect, mine was a fine muslin. I then sewed the crocheted lace trim all around the each edge piece separately, not sewing down the corners where they meet.

I then miter and turn the corners and sew them in place.
You now turn over your hanky and trim away the fabric from the back of all lace as shown.
You will leave a small edge against the seam all around the hanky.
You now press the edge in toward the body of the hanky.
Turn the hanky over and topstitch a seam on top of this raw edge as close to the original seam as possible.  
You now have a finished handkerchief with "Irish" lace.

I will be linking to Kathleen's White Wednesday  at her site Faded Charm. I will also join Becca for Show and Tell Wednesday at her site Blue Cricket Design.  Please go on over and see what other awesome things people are blogging about.