Showing posts with label Whatever Goes Wednesday. Show all posts

Monday, January 10, 2011

Altered Couture for Home Decor

Have you ever heard of Altered Couture?  It isn't just a magazine (pictured above) made by the Stampington Company.  It is a movement in fashion that has taken hold (revived) in the last several years.  By this, hobbyist and artist create one-of-a-kind individual pieces with the recycling of past fashion materials.  A few examples that are a treat to look at are Armour Sans Anguish and  Supayana.

Image: Supayana

 Image: Armour Sans Anguish

Neat huh.  Imagine recycling clothes to look this good.  What if it was done for home decor?  I have seen a lot of things repurposed, upcycled, or altered, whatever you want to call it.  In home decor you really need a lot of yardage.  It isn't as easy to take clothes and recycle for the home.
You know my tea cozy.  It was altered from a Woolrich wool vest.

One commenter said it looked like a sweater for my teapot.  She was really close.  Here is the original vest.   

What do you think about upcycling?  


Do teapots look good in sweaters?

How about this table runner?

The shabby chic fabric for this table runner came from a Liz Claiborne dress.

Here it is after I used the bottom for the table runner.  These are the only two pieces I have ever upcycled.  I really found it fun to do.  I liked challenging myself to look at something and find another use for it.  Have you ever altered any clothes? 
The tea cozy in for sale in my Etsy Shop.
I will link to these ladies go and visit them.
Get Your Craft On at Today's Creative Blog
Toot Your Horn Tuesday at A Silly Little Sparrow
Second Chance Tuesday at Bella Rosa Antiques
Boring to Better Party at Savvy Southern Style
Whatever Goes Wednesday  at Someday Crafts
Show and Tell Wednesday at Blue Cricket Design 
Whassup Wednesday at Elements Interiors

Tuesday, November 23, 2010

Glittered Pears

I saw these glittered pears in a magazine and I thought they would be really pretty on a table.  You will need an inexpensive faux pear.

Then cover your pear with Mod Podge.  I applied mine with a sponge brush.
Then all you need to do is cover it completely with glitter.

The glitter I used was called Glamor Dust, it was very fine. (Hobby Lobby carries it.)

Last, I trimmed a silk leaf and hot glued it to the base of the stem of the pear.  I found the leaves in the bridal department at Hobby Lobby too. 

Now all you need to do is decorate your holiday table.  
I will join these web sites, go and visit them.

Whatever Goes Wednesday at Someday Crafts
Show and Tell Wednesday at Blue Cricket Design
Get Your Craft On  at Today's Creative Blog

I will join Joni at Red Couch Recipes for the Thanksgiving Challenge.  I am thankful for coffee.

Sunday, November 14, 2010

Gold Fever

I have been taking a can of gold metallic spray paint to everything.

It doesn't have any anything to do with the price of gold, but I want my Thanksgiving to have some sparkle. I got the acorns at our local park.  They came in two pieces and I just glued the caps back on after I painted them.


Leaves even look good spray painted gold.  Pick a fresh leaf off the tree, or if they won't be around that long, you can press them and then spray paint them.  I talk about pressing leaves to keep here.

 And, especially pumpkins look fantastic painted gold.  I talked about how to gild a pumpkin with a can of spray paint here.

 So try a little bling in your Thanksgiving tablescape.  

I will link to these fabulous blogs.  Go and visit them.
Seasonal Sundays  at The Tablescaper
Metamorphosis Monday at Between Naps on the Porch
Make It For Monday  at Cottage Instincts
Re-Party at First a Dream 
Just Something I Whipped Up  at The Girl Creative
Market Yourself Monday at Sumo's Sweet Stuff
Get Your Craft On at Today's Creative Blog
Whatever Goes Wednesday  at Someday Crafts
Toot Your Horn Tuesday at A Silly Little Sparrow
 I will join Joni at Red Couch Recipes for the Thanksgiving Challenge.  I will put at the end of every post till Thanksgiving what I am thankful for.  I am thankful for the farmers who work so hard in the fields and get food on our tables.  With Illinois being in the corn belt, the image below has been a familiar one this fall.

Image extension.ia.state.edu

Sunday, August 29, 2010

Seasonal Change

With Labor Day fast approaching, the kids back in school, and our first home football game (which they won!) it can only mean the seasonal change is right around the corner.  The days are getting shorter and the nights are crisp and cool so my decor has got to change.  I have had this wreath on the door all summer.

But, as much as I love the beach, I wanted to give the front door a little more of a harvest feel.  

This wreath was super easy to make.  I just took two different colored sunflower picks and took a sunflower off of the grouping of sunflowers with pliers.  I took the two different colored sunflowers and wove them into the top of a 12-inch grapevine wreath.  It looked a little bare so, I had picked up two sunflower picks at Joann Fabrics (these picks had leaves, berries, and wheat on them) and I stuck one of those on each side of the sunflowers and that gave it the look I wanted.  I was trying to go for simplicity with a touch of color. I love the seasonal changes and will always have a lot of that in this blog.

I will remind you of my CSN $45 gift certificate giveaway.  Click here to enter. 

 I will also remind you to enter any giveaways you might be hosting to Atticmag's giveaway link up for their Giveaway Friday. Click here to enter.  They are also hosting a backsplash giveaway if you need a new backsplash!
 I will link to these parties:
Metamorphosis Monday at Between Naps on the Porch 
Just Something I Whipped Up at The Girl Creative
Making the World Cuter at making the World Cuter
Market Yourself Monday at Sumo's Sweet Stuff
Show Off Your Cottage Monday at The House in the Roses
Make It For Monday at Cottage Instincts
Toot Your Horn Tuesday at Silly Little Sparrow
Get Your Craft on Tuesdays  at Today's Creative Blog
Show and Tell Wednesday at Blue Cricket Design
Whatever Goes Wednesday at Someday Crafts
Transformation Thursday  at The Shabby Chic Cottage

Tuesday, August 24, 2010

Slipcovering the Chairs

Sometimes the hardest space to decorate is your own.  Then, factor in the lack of a budget and your space becomes a very challenging project.  When we remodeled two years ago we added so much space I got my long awaited for dining room.  It used to be our living room.  But, after that large a remodel there were no dollars for anything to go into that new dining room.  I had some luck in getting a few pieces of furniture from family.  Now the challenge becomes making it your own and not a mixed up grouping of furniture.  I have been working hard on making the pieces of furniture all fit together and one of the easiest ways to restyle a chair is to slipcover it.  This table came to me with four chairs.  They go with the table but I never have liked the pattern on the back of the chair.  So, I left them alone for awhile and tried to decide what to do with them.  

After much debate, I finally decided on osnaburg (Honest  berg) fabric.  It looks like a grain sack but they sell it by the bolt at Walmart.  I believe it was right at $4 a yard.  This fabric is used in primitive crafts.  Pictured here is the fitting of the slipcover.
Half of the fun of slip covering is that you have a blank slate and you can do just about anything.  I wanted a flirty fun twist so I laced up the back of my slip cover with a black grosgrain ribbon.  
 
I first created this slip cover for an Irish pub table I did in March.  For that slip cover I painted No. 3 Dublin on the front.   This is what I mean about being able to design them any way you want.  
Here are the finished slip covers.  I can't do anything about the floor yet, but I do have some other things in the dining room I will show off soon.
Price to slip cover 4 chairs under $50.
 I will link to :
100 Ideas for Under $100 at Beyond the Picket Fence
Penny Pinching Party  at The Thrifty Home
Whatever Goes Wednesday at Someday Crafts
Fabric  Fun Thursday at Cheap Chic Home
Transformation Thursday at the Shabby Chic Cottage
Strut Your Stuff at Somewhat Simple

Tuesday, May 11, 2010

Gifts From the Sea

I had this idea last year; when I went on vacation, to buy some shells and make this wreath I had been seeing everywhere.  You know the one made out of a grapevine wreath that sorta looks extra twiggy.

Image from pinecones.com
But, as all good plans are made; I went shopping and that is not the wreath I found.
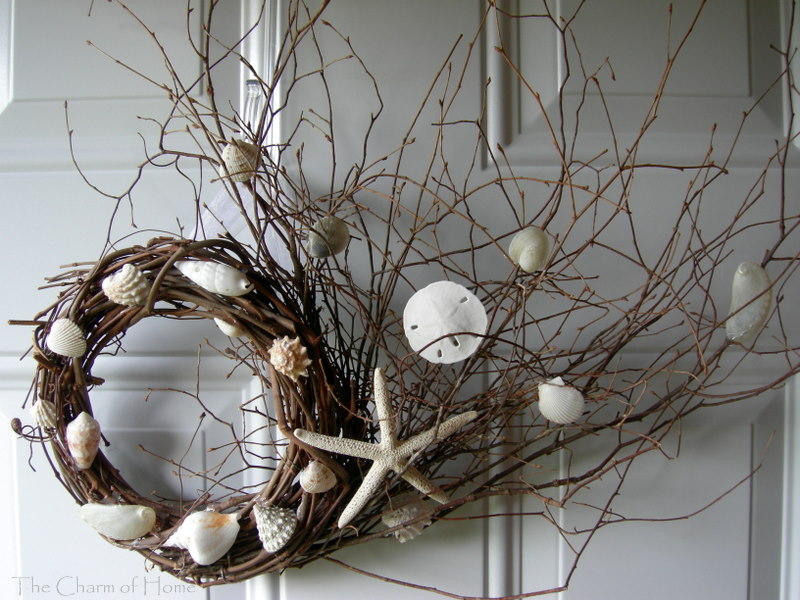
I went to Michaels craft store and this was the wreath I found.  It was tagged 8-inch twig fan. My imagination took over; as it usually does, and I saw this wreath looking like a wave washing the shells up on the beach.  I really liked it better than what I went to the store for.
So I unpacked some of the shells I had purchased on vacation.
I hot glued those  shells and some that we also found on the beach to the wreath.

 This is how it turned out.  Since it is asymmetrical,  I used two hanging ribbons to get it to hang the way I wanted it to.  I now have it on my front door for summer.
I will link this to Whatever Goes Wednesday at Someday Crafts.
And, White Wednesday at Faded Charm.  
Please go over and view all the wonderful things being entered over there.
 

Wednesday, May 5, 2010

A Gift For Mom

You don't always have to spend money to create a nice gift for Mom.  I had all of these items on hand and made a useful gift for Mother's Day.

I am going to show you how to make a little jelly jar sewing kit.  
You will need:
canning jar with ring
cardboard
plain fabric, lace or doily
vintage buttons
thread
needles
pins
scissors
thimble
tape measure
The contents can vary you might put something different in yours based on what the person sews.

Use your ring for the jar as a guide and cut two circles to fit inside your lid.

You can use a thin small doily or just lace for the cushion.  I am going to use lace.
Attach a small handful of fiberfill to the cardboard circle using a tacky craft glue.  Cut a circle of fabric and lace to go over your fiberfill.  Wrap the fabric with the lace on top and glue to back of cardboard circle covered in fiberfill.  Cut off any excess fabric.  Press the whole thing into your ring.
Glue the remaining circle to the bottom of your fiberfill circle.  Press the whole thing back into your ring.


 Collect your vintage sewing accessories that you will use in your kit.
 Fill your jar and place the lid on and fill pincushion with pins.   A practical gift anyone could appreciate.