Showing posts with label fun kid stuff. Show all posts

Thursday, January 26, 2012

Home Sweet Home #51

Hello and welcome to Home Sweet Home!  I am showing off today a little outfit I made for a sweet little niece that I babysit half of the week. 

I made her a little tutu.  These ideas came from Pinterest and they were pinned off of blogs.  
I got the idea for the tutu here.

And if you have a tutu you have to have a pair of ballet slippers!  I got the idea for these here.

And, the Birthday Girl looked fantastic modeling her tutu and slippers! 

Now, I would like to feature some posts that got my attention from last week's Home Sweet Home!   

 Martina at Northern Nesting made over this lovely dresser.

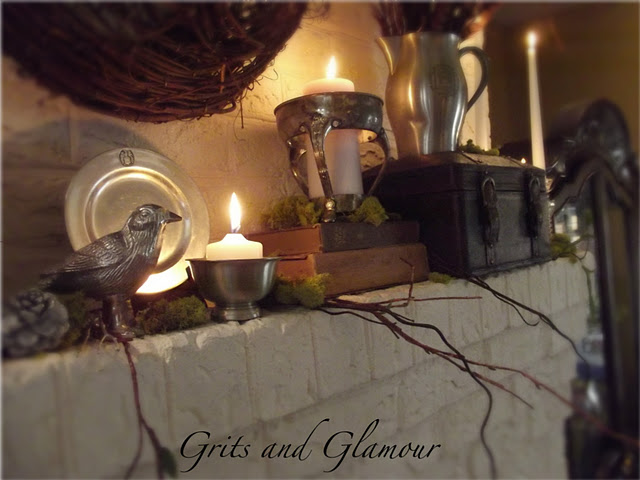
Barb at Grits and Glamour showed off a gorgeous winter mantel.

Amanda at Girl In Pink had a wonderful vanity makeover with AS chalk paint.

Jacqueline at Cabin and Cottage showed off her winter buffet.  It looks like a fairytale cottage when she styles it!

Suzanne at Pieced Pastimes sewed up some linen and lace pincushions that were adorable. 

Thank you to all who join me at Home Sweet Home!  It is awesome to have you here!  
Sherry
I will join these ladies today:
 Vintage Inspiration Friday at Common Ground (there is plenty of vintage inspiration in my highlighted links)
Feathered Nest Friday at French Country Cottage
Potpourri Friday at 2805
Air Your Laundry Friday  at Freckled Laundry
Show and Tell Friday at My Romantic Home
Guidelines for Home Sweet Home Party:
Attention: To link up with inlinkz you must have a permalink back to this party in your post or they will not allow you to link.  
Link up anything in your home or garden.  I love seeing neat shops too!
My button is on my sidebar for the party, if you want to use it.   If you are new here I hope you will become a follower. Please don't link up more than two posts.  No Etsy link ups or direct advertising, please.  Please visit some of the other blogs and get some great inspiration.  Thanks.:)
Now let's see your beautiful homes!

Tuesday, December 13, 2011

Spicy Gingerbread Cookies

I normally only make gingerbread decorations.  But, this year one of the sons requested some to eat.  I found this gingerbread recipe on a healthy website. This recipe was from: Prevention's The Healthy Cook.  

Ingredients:
6 TBSP vegetable shortening or butter
3/4 cup packed brown sugar
2 1/2 cups all-purpose flour
1 TBSP ground cinnamon
2 TSP ground ginger
1 1/2 TSP ground cloves
1 TSP baking soda
2 TBSP molasses
1/3 cup water

Directions:
  1. Preheat the oven to 375 degrees.  Coat your baking sheets with a non-stick spray or line with parchment paper.
  2. In a large bowl, cream together the shortening or butter and brown sugar.
  3. In another large bowl, combine the flour, cinnamon, ginger, cloves, and baking soda.  Add to the flour mixture and stir until well-blended.
  4. In a cup, stir the molasses into 2 tablespoons of water.  Add to the dough and mix well.  Add more water, if necessary,  to form a stiff dough.
  5. Divide the dough into four equal-size pieces.  Roll each piece out to 1/8" thickness.  Using cookie cutters or a sharp kinfe, cut out cookies and place them onto a prepared baking sheets, leaving 1" between cookies.
  6. Bake for 7-10 minutes, or until the cookies are lightly browned.
 Optional Icing:  To decorate with powdered sugar icing, combine 2 TBSP milk, 3 cups of confectioner's sugar and 1 TSP vanilla.  Add more milk if necessary to make a smooth, thick icing.  Drizzle or pipe over the cookies.
Serves: 60
Enjoy!
Sherry
I will link this to: 
Wow Us Wednesday at Savvy Southern Style
This Chick Cooked at This Chick Cooks
Friday Food at Mom Trends
Foodie Friday at Designs by Gollum 
Also, joining a new party with Elna Wednesday Show Off  at Elna-Sudden. 
And, What's It Wednesday  over at Ivy and Elephants 
Check these great blogs out!

Sunday, August 28, 2011

All Free Holiday Crafts eBook

 Needing some ideas for your fall craft file?  All Free Holiday Crafts has some ideas.  Out this week is their new 11 Easy Halloween Craft Ideas eBook .   In this eBook you will find craft ideas for everyone.  Featured are party decorations, table decorations, scary decorations, and kid-friendly decorations.  Click the link above to the eBook and take a look.  It's all free!  Featured in this eBook is the Spiderweb Silhouette Lantern I made last year on my blog.  Go and check it out.  Halloween is just around the corner.
 
 
 Happy crafting!
 Sherry

Wednesday, July 6, 2011

Fruit Pops

I first saw these on Pinterest.  I  saw them and knew the kids would love them.

The directions were to take fruit (any) and add it to a popsicle mold and pour in Capri Sun.  I am in the grocery this week and this popsicle is on the cover of MS Food.  No wonder it was all over Pinterest.  Anyway, it is healthy and a great summer snack.  I didn't even have to write down how to make it!  Easy summer!
I will link to:
Foodie Friday at Designs by Gollum
Friday Food at Mom Trends
 

Friday, December 24, 2010

What Santa Looks Like

Thomas Nast, the original illustrator of A Visit From St. Nicholas, was the person responsible for the way we see Santa today.  When Nast was a boy he stayed up every Christmas Eve trying to catch Santa in the act.  He never saw Santa, always falling asleep before he arrived.  After waiting for Santa for many Christmases he decided to leave Santa a note asking him for a photo of how he looked.  Nast never received a picture of Santa but he did dream about what he looked like.  When Nast grew up he drew pictures of the Santa we know today and shaped our image of the modern day Santa forever.

 Image corbisimages.com

A postcard from my vintage collection postmarked 1910.
For fun with your little ones NORAD tracks Santa's route continuously on Christmas Eve.
Sherry

Monday, December 13, 2010

Nativity Party

I am happy to join Lynn today at her site Happier Than a Pig in Mud for her Nativity Party.  This our nativity.  It is very humble, not any brand that I know of but I really like the pastel colors.

My son brought home a really neat library book the other day from school.  I thought I would show it.  It is called The Christmas Miracle of Jonathan ToomeyThe story is as sweet as the illustrations.

Story synopsis: When a broken hearted boy loses the treasured wooden nativity set that links him to his dead father, his worried mother persuades a lonely ill-tempered woodcarver to create a replacement, and to allow her son to watch him work on it. The commission takes their relationship to unexpected places as the young client makes greater and more difficult demands of the woodcarver's ability, and as Christmas approaches, the three struggle to come to terms with each other, their painful memories and the process of putting their unhappiness behind them. 
I enjoyed how the story centered around the carving of the nativity.  I thought you might enjoy it too.  
Go and visit Lynn and view some more nativities.
I will also join Tabletop Tuesday at A Stroll Thru Life
Go and visit her too.
Sherry

Monday, October 4, 2010

Haunting the Art

I have a nice piece of art hanging in my dining room.  I wanted to give it a more seasonal display that would be fun.  So I used silhouettes.

 I used templates from marthastewart.com.  This link will take you right to the templates.

I first got the template to the size I wanted and then I used black construction paper and a silver Sharpie to trace the templates.  

Here is how I applied my tape.  This is actually a blooper.  The tape is on the wrong side.

 Here is my little witch flying in my picture.  I wasn't sure if I was going to like this project but I was surprised how I did like the look of it.

 Here is another little character I added.  I cut a ghost out of tissue paper.  This was also a blooper.  The ghost has messy eyes and then when I taped him the tape stuck to several areas it shouldn't.  I remade this ghost three times before I got the tape on it without a bunched up ghost.  I learned this try and try again technique from teaching myself to sew.  My best friend when I learned to sew was my seam ripper!  Fun fact:  I taught myself to sew and learned how so I could copy some of Princess Diana's clothes!  Was quite enamored with her at 20, like so many people were.

 Here the little ghost finally made it in the art!

So here is the haunted art.  This would be a great project for your kids to try.  My kids begged me to decorate for Halloween when they were around 10 or 12.  There are so many fun and simple things like this you can do.  Cost $0  Printed the templates off internet and had black construction paper, tape, and a Sharpie. It is a lot cheaper than changing out the art.  Have fun with it.
Pop over to these sites and see all the creativity going on.
I will link this to:
Get Your Craft on at Today's Creative Blog
Toot Your Horn Tuesday at Silly Little Sparrow 
Nifty Thrifty Tuesday at Coastal Charm 
100 Ideas Under $100 at Beyond the Picket Fence
Show and Tell Wednesday at Blue Cricket Design
Whatever Goes Wednesday at Someday Crafts
Penny Pinching Party at The Thrifty Home 
Transformation Thursday at The Shabby Chic Cottage
Thrifty Thursday at Tales From Bloggeritaville

Don't forget, click here to enter for up to 5 chances to win a $45 CSN gift certificate! 

Monday, March 29, 2010

Basket Dayz

I am joining Kim for Basket Dayz at her site Cheap Chic Home.  If you have made a basket for Easter or spring she would love you to join her.  I can't get enough of this bright apple green color.  I just love it.  So when I saw this little basket at the thrift store I just knew it would transform into the best Easter basket project.  This is very similar to what I did last week (you can view that here) but when you change up the colors and do different embellishments you can get a very different look. Here is how I did it.
Supplies:
Basket
3 yds. of ribbon of choice
Embellishment to basket ( Example- flower)
1 1/2-2 yds. of coordinating tulle (depending on how full you want basket) 
 

I first looped the coordinating ribbon on the stem of the basket.

Before I started wrapping I put a good knot in it.  Then I wrapped the ribbon all along the basket stem.

Then once I got to the other side of the basket stem I put another good knot in it.
I then took a 4 inch wide strip of the tulle and folded it back and forth like so.  (I got ahead of myself and cut a notch out of the left side, just ignore that.) 
Then you fold your tulle rectangle over and cut the corners off of of each side of the top of the rectangle, your cutting on the fold.

Then you unfold that rectangle again and tie it into the ribbon you left on the basket.  Here you can pull out the tulle and "fluff" it into a bow, just like you do when you make a homemade ribbon.

Now take some form of embellishment.  I picked out some flowers and I cut the stems much shorter.
 
Here I folded up the stem even smaller and I would wrap it with floral tape to secure and keep any sharp edges from little fingers.

Before I applied the flowers I pulled out the tulle making it look just like you would a ribbon you have made.  Then I tied in the flowers with a good knot and then I finished up with a bow in front of the flowers.
Now Your ready to stuff your basket with the rest of the tulle.  Just cut it up into small (10"x10") squares.  They don't have to be perfect.  The tulle makes a fantastic filler and it cushions the eggs.  

Please go over to Kim's site and see all the basket projects going on.  I will also link this to the Spring/Easter Party at Life As Lori.

I will also be linking this to: