Monday, June 18, 2012

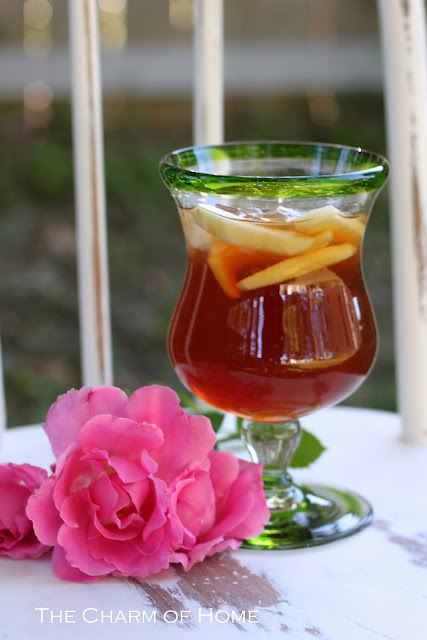
Savouring Summer Tea

I wonder what it would be like to live in a world where it was always June.
                                                                                        ~L.M. Montgomery


I believe the nicest and sweetest days are not those on which anything very splendid or wonderful or exciting happens, but just those that bring simple little pleasures, like pearls slipping off a string.
                                                                                                ~L.M. Montgomery

Are you taking a  moment to savor summer?
The teacup is Fair Winds by Alfred Meakin.
Sherry
 I will link this to:
A Return to Loveliness  at A Delightsome Life
Savour the Summer Tea Party at Rose Chintz Cottage
Tea Cup Tuesday at Martha's Favorites
Tea Cup Tuesday at Artful Affirmations
Your Cozy Home Party  at Cozy Home Scenes
Table Top Tuesday  at A Stroll Thru Life
Wow Us Wednesday at Savvy Southern Style

Sunday, June 17, 2012

Blue & White Love

 Just a mosaic in admiration of my blue and white ironstone.
Sherry
  I will join:
Sunday's Best Party  at My 1929 Charmer
Seasonal Sundays at The Tablescaper
Show Off Your Cottage Monday at The House in the Roses
Mosaic Monday at Little Red House
Make it Pretty Monday at The Dedicated House 
Heart and Home Link Up  at Trisha' Heart & Home  
Sunny Simple Sundays  at Sunny Simple Life                                              

Friday, June 15, 2012

Simple Pleasure Friday: Fresh Sugarsnap Peas

One of my favorite things to do (and don't do often enough) is to peruse our local farmer's market with my boys, tasting and buying fresh food.

Last week we bought some sugarsnap peas and as soon as I tasted them, memories rushed back to me.   I haven't had fresh sugarsnap peas since I was a kid. 


{Porcelain Farmer's Market container from my best friend, Frammy.  By Anthropologie}

What struck me about the sugarsnap peas was not how good they were (I like them but can only eat a few at a time... it's not "love") but how they brought me back to summers...  The flavor made me think of my Grandma Maestranzi's summer cottage vegetable garden and also of my Aunt Janet's garden in Rhode Island.  It also reminded me of snapping green beans for my Grandmother.  It's amazing how taste & smell bring on the memories. 

Had any good simple farmer's market pleasures lately?


xoxo, Lauren

Enjoy your weekend!!

If you'd like help creating a home you absolutely love, contact me about our design services.

Thursday, June 14, 2012

Home Sweet Home #71

Hello and welcome to Home Sweet Home!  This week I made yet another version of the fruit flavored tea.  I made this tea with strawberries and apples.  My taste testers like each new version of this tea more than the last version I have made.  So, it was a hit.  I have made blackberry tea and real peach tea.  Click on the links to get the recipes.

Ingredients:
4 cups of hot black tea (I used 2 Luzianne decaffeinated Family tea bags)
1 cup of strawberries sliced 
1 cup (or about 1-2 small)  apples peeled and sliced
honey to taste or 3/4 cup of sugar
  • In a medium pot combine the hot tea with the strawberries and apples and simmer for 10 minutes. Getting the fruit soft brings out the most juice and flavor.
  • With the back of a wooden spoon, crush the fruit in the tea and then pour through a fine strainer into a pitcher.  I crushed mine again in the strainer.
  • I did use coffee filters to strain out the strawberry seeds, which go through the strainer.
  • Add honey to taste or use 3/4 cup of sugar.
  • I then pour this warm tea over a half of pitcher of ice.
  • Chill for at least 2 hours and serve.
Yield: 4-5 servings

I have been on a no processed food spell for awhile now.  My whole family doesn't comply but, it is nice to make tea with fresh fruit instead of chemicals for them.

Now I would like to highlight some of the posts that caught my eye last week at Home Sweet Home.
Mary Alice at Chateau Chic showed off her lovely dining room.

Laurie at Heaven's Walk created a gorgeous French Market Basket.

 Debra at Common Ground showed her beautiful new dining room slipcovers.

Denise at Pink Postcard also showed off her pretty new linen slipcovers.

Annika and Sussi at Precious Sister made their own DIY chalkboard clock out of a pot lid!  How cute is this!

Miss Kitty at Miss Kopy Kat made her own faux Italian chandelier.

So, much talent in all of you ladies!  Thank you to all who join me at Home Sweet Home!   It is wonderful to have you here! 
Sherry
I will join these ladies today:
Vintage Inspiration Friday at Common Ground 
Feathered Nest Friday at French Country Cottage
Show and Tell Friday at My Romantic Home
Home and Garden Thursday  at A Delightsome Life 
Creative Things Thursday  at The Vintage Farmhouse
Say G'day Saturday  at Natasha in Oz
Redoux Interiors Link Party 

  Guidelines for Home Sweet Home Party:
Attention: To link up with inlinkz you must have a permalink back to this party in your post or they will not allow you to link.  
Link up anything in your home or garden.  I love seeing neat shops too!
My button is on my sidebar for the party, if you want to use it.   If you are new here I hope you will become a follower. Please don't link up more than two posts.  No Etsy link ups or direct advertising, please.  Please visit some of the other blogs and get some great inspiration.  Thanks.:)
Now let's see your beautiful homes!

Wednesday, June 13, 2012

Curtains Made Out of Ticking

I made curtains out of pillow ticking for my dining room.  The ticking is a really good choice for curtains.  Ticking is a heavy canvas which makes a good heavyweight fabric for a curtain without a lot of expense.  I needed 11 yards so that limited my choices on where to find that much yardage.  I ordered my ticking off of Fabric.com.  The first thing I will tell you is to measure your yardage as soon as you get the fabric.  I ended up making my curtains a few inches shorter than I had intended and I used some other fabric I had on hand to make the tiebacks because I was a 1/2 yard short on my order. 

Here is my high tech measuring tool!  This was another reason I really liked working with ticking, it was easy to lay out and measure because it is a stiff fabric.  I didn't wash it first so the sizing helps keep it stiff.  I measured the height of my curtains by measuring from the floor to the top of the curtain rod.  I then added 5 inches to the top to create a pocket and 5 inches to the bottom for a hem.  This makes the most basic curtain panel.

You really want to measure your the width of your window and make the curtains two times that width.  I had to use a 32 inch-wide ticking instead of a 45 inch-wide so, I really didn't have my fabric two times the width.  One side of the ticking has this stripe that doesn't look like the rest of the stripes.  I pinned these two stripes together on each piece of fabric so I can sew a seam  in each panel that doesn't show.

Here is the seam right side up.  When you press this the seam will disappear and the curtains will look like one big panel.

I then sewed the panel together with this seam and turned it over to press the seam flat.  The edge of this side of the ticking was finished so it won't ravel.

The rest of the edges will ravel so, I used a serger to create an overlocked edge.  You can use any fabric edge finish you are comfortable with.

This is the side hem on the curtains.  Just turn, press, and sew desired amount to finish the sides.
In this photo I have finished the edge of the top of the curtain, turned, and pressed it, and I am measuring the three inch pocket and pinning.  I then sewed it in place to finish.

I really liked the drape of this fabric.  I am checking it here to see what it looks like.  I actually crumpled it with my hands and left it unpressed.  The fabric is so heavy it falls nicely and the crumples hardly show.

Here I am measuring for the final hem.  I turned, pinned, and sewed the three inch hem in place and then I pressed it.

This is the tiebacks.  They measure 32 inches (the width of the fabric) by 5 inches.  Cut two.

Pinning right sides together I sewed one end, and the 32-inch side together, leaving one end open to turn to the right side. 

I then turned the tieback, pressed, and top stitched the whole tieback together.  Then I sewed these plastic rings on the inside corners to hang the tiebacks by.

Here are the finished curtains.  They are unlined but you can't see through them.    I really like how they turned out.

Sherry
 I will link this to:
Air Your Laundry Friday  at Freckled Laundry
Thriving on Thursdays  at Domesblissity
Rooted in Thyme Simple and Sweet Fridays
Transformation Thursday at The Shabby Creek Cottage 
Adorned from Above Blog Hop  at Adorned from Above

Client Family Room Sneakity Peek & a message from the past

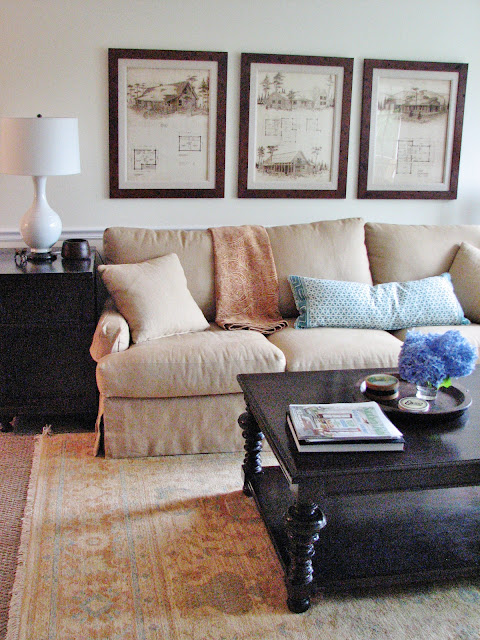
I'm not back to work yet and am still on a "maternity leave" of some sorts, but I have gotten a few things accomplished.  I wanted to share a little sneakity peek of a client's family room:


Our client  found the old cabin blueprints above the sofa at a thrift store years ago and we loved them too so we had them framed.  The blue bowl on the coffee table is one I found a while back and its design is made out of safety pin idents into the clay that were then outlined in gold.  Right now it's a corral for the remote controls, but when entertaining it can be emptied and filled with something pretty like flowers or napkins or something seasonal.

Their new linen sofa by Lee Industries is so comfortable and I wish I'd fixed the back cushions for this pic after I put the throw blanket on but I didn't notice that until later. Oh well.  I love its lines and it's such a comfy "vegging" sofa.


The faded oushak rug has hits of blue in it, so for a bolster pillow, we used my "Pierced Porcelain" linen in a custom blue and we had the pillow edged in the Greek key trim.   

 I added a few interesting accessories to make the room feel like home (my client is very trusting and really lets me have fun & get creative with the accessorizing, which I love.  It's all a total surprise to her when she comes home-) and one of them was an antique children's book full of stories.  Glancing through the book I found this inscription:

{Hard to read but it says, "If my name you need to see, Look on page 103"


Of course I had to know the name, so I turned to page 103:

{If my name you still would find, Look on page marked 59"}


....Well, you can't stop there (at this point I'm thinking, "Ok kid, when is this going to end???") so I kept turning:


"Susan Cornelia Jones"
...
"If on that name you chance to look, Think of me and close this book."

...And that made me smile, because as I slowly closed the book, I did think of Susan Cornelia Jones.


...There was no way not to.  Reading her note gave us just the tiniest little insight into this girl...  she was fun & creative and patient... and more than that, she wanted to be thought of one day, to be remembered. 

I looked her up and found a couple of different Susan Cornelia Jones's  (I mean come on, I'm searching for a "Jones!!") but I did find a Susan Cornelia Jones who lived in Washington, DC in a Georgetown townhouse as a girl and then moved to Virginia with her husband and two children.  I found the book around here so just maybe.  And I found another from Long Island who died at the age of 24.  And then another from Texas... 

I'm not sure if any of these are her or not, but either way, I hope she's looking down today & knows we found her message.

xoxo, Lauren

If you'd like help creating a home you absolutely love, contact me about our design services.

Monday, June 11, 2012

Nutella Stuffed French Toast


My teens love Nutella, so when I saw this recipe on Pinterest I had to try it.   It is very rich!  The Nutella lovers in my house didn't think you need the maple syrup with this.  It would be great for a special breakfast, like for Dad, this Father's Day.

4 slices Texas Toast
2 eggs
1/4 cup heavy cream
1/8 cup powdered sugar
4 Tbsp Nutella
maple syrup
fresh fruit

Preheat a nonstick skillet over medium low heat.  In a bowl whisk together the eggs, cream, and powdered sugar.  Take 2 slices of the Texas Toast and spread 1 Tbsp of Nutella on each one.  Sandwich together and dip both sides in the egg mixture.  Grill on each side until brown, about 3-4 minutes.  Remove from heat and serve immediately with maple syrup, fresh fruit, or plain with a sprinkling of powdered sugar.
Enjoy!
Sherry
I will link this to: 
Friday Food at Mom Trends
Foodie Friday at Designs by Gollum
What's It Wednesday   at Ivy and Elephants  
Thriving on Thursdays  at Domesblissity
On the Menu Monday at Stonegable 
Rooted in Thyme Simple and Sweet Fridays